


Creativity and design, Graphic design
How to Create a Pop Art Portrait with Photoshop in 5 Steps

Aug
With Photoshop, it’s very easy to turn our photos into a Pop Art image. I’m going to show you a simple and quick way to get your portrait in just 5 steps. I chose a photo of my cousin Paula, and since she’s so gorgeous, anything I do to her photo turns out quite striking 🙂
Adobe Photoshop CS5. List of Tools Used and Their Keyboard Shortcuts
![]() Magic Wand (W)
Magic Wand (W)
![]() Eraser (E)
Eraser (E)
![]() Paint Bucket (G)
Paint Bucket (G)
![]() Zoom (Z)
Zoom (Z)
![]() Brush (B)
Brush (B)
![]() Elliptical Marquee (M)
Elliptical Marquee (M)
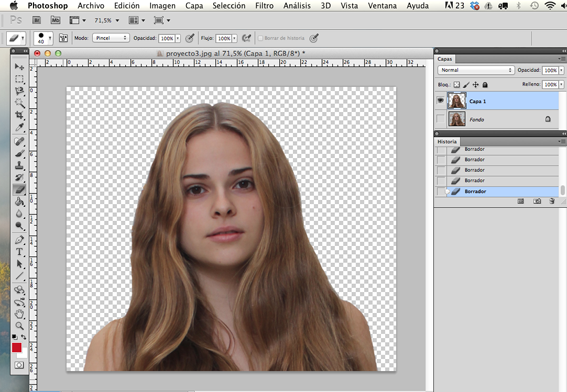
1. Remove the background from the selected image:
Open Photoshop and in the top menu File -> Open select the desired photo. It’s best if it has good lighting to better highlight the features.
Select the Background layer and duplicate it (Ctrl + J). Hide the Background layer (eye icon) and keep the duplicated layer visible.
There are several ways to remove the background. If it’s a solid color, choose the Magic Wand tool, click on the background color, press Delete, and then deselect (Ctrl + D).
In this case, we’ll also use the Eraser tool. In the end, you should have a transparent background.
2. Threshold Adjustment:
Duplicate Layer 1 (Ctrl + J) and hide the new one. Select Layer 1, click on the name and rename it “Base.” Go to the top menu Image -> Adjustments -> Threshold. If your photo is well-lit, one threshold adjustment might be enough. In that case, you can delete the duplicate.
In this case, a threshold of 92 works well, but we lose the lines of the mouth and eyes. That’s why we duplicated the Base layer before the threshold. You can duplicate it as many times as needed with different threshold levels. I created two more layers named “Mouth” and “Eyes.”

Adjust each layer with the desired threshold and erase everything else. For example, in the “Mouth” layer, erase everything but the mouth using the Eraser tool.
Remember: the Base layer goes under the others (eyes, mouth, etc). The Background layer stays at the bottom.
It’s important to have the outlines of the hair, face, and eyes defined because we’ll need them for coloring in Step 4.
3. Merge and refine:
Select all layers except the Background (Ctrl + click). Then press Ctrl + E to merge them. If there are black lines you don’t like (like wrinkles), you can paint over them with white. Likewise, you can use the black brush to restore missing lines. Name this new layer “Merged Layer.” To soften the edges go to Filter -> Gaussian Blur and apply a radius of 1.
In the top menu Layer -> New -> Layer. Name it “Skin” — we’re now ready for Step 4, the most fun part!

4. Color:
Set the Skin Layer blending mode to Multiply. Choose a color from the top color box in the Color Palette, and make sure the other box is white. Use the Brush tool to paint the skin. It’s easier to paint everything and then erase the eyes, mouth, or edges with the Eraser. You can enable the Background Layer to see borders better. Once done, go to Filter -> Sketch -> Halftone Pattern. I used size 2, contrast 4, and dot pattern.

Layer -> New -> Layer, create new layers: “Eyeshadow”, “Blush”, and apply the same Filter -> Sketch -> Halftone Pattern. All coloring layers must use Multiply blending mode.
For the blush, I reduced opacity to 19%. Create a new layer called “Mouth”. I used the same blush color with 100% opacity. Add another layer called “Hair” and color it purple — it’s starting to come together!

For the hair I used a different effect and swapped the white for another shade of purple. Go to Filter -> Artistic -> Sponge and set Brush Size 6, Definition 24, and Smoothness 5. All portrait coloring layers must be in Multiply mode.
Now we add a background. Create a new layer Layer -> New -> Layer, and place it below the Merged Layer. Pick a color from the Color Palette and fill it using the Paint Bucket. For a more pop effect, I added a layer called “Spheres” and used the Elliptical Marquee to draw circles, filled them with white using the paint bucket. Background and Spheres layers use Normal mode.

5. Frame the image and final touch:
These are just personal touches: a beauty mark and eye highlight. Create a layer called “Touches” and use the Brush to add a white dot to each eye, and a black dot for the beauty mark that got lost along the way 😉
To finish, we add a border. How? Select Menu -> Select All. Then Select -> Modify -> Border. In the dialog box, set the border size in pixels. Choose black in the color palette and use the Brush to paint inside the selection freely. Once done, deselect with (Ctrl + D)
And that’s it!
